GPT Image 2 और diffusion image-to-image workflows के लिए practical troubleshooting guide: composition drift, lighting mismatch, face और hand errors, mask spillover, blurry texture और edge artifacts diagnose करें.
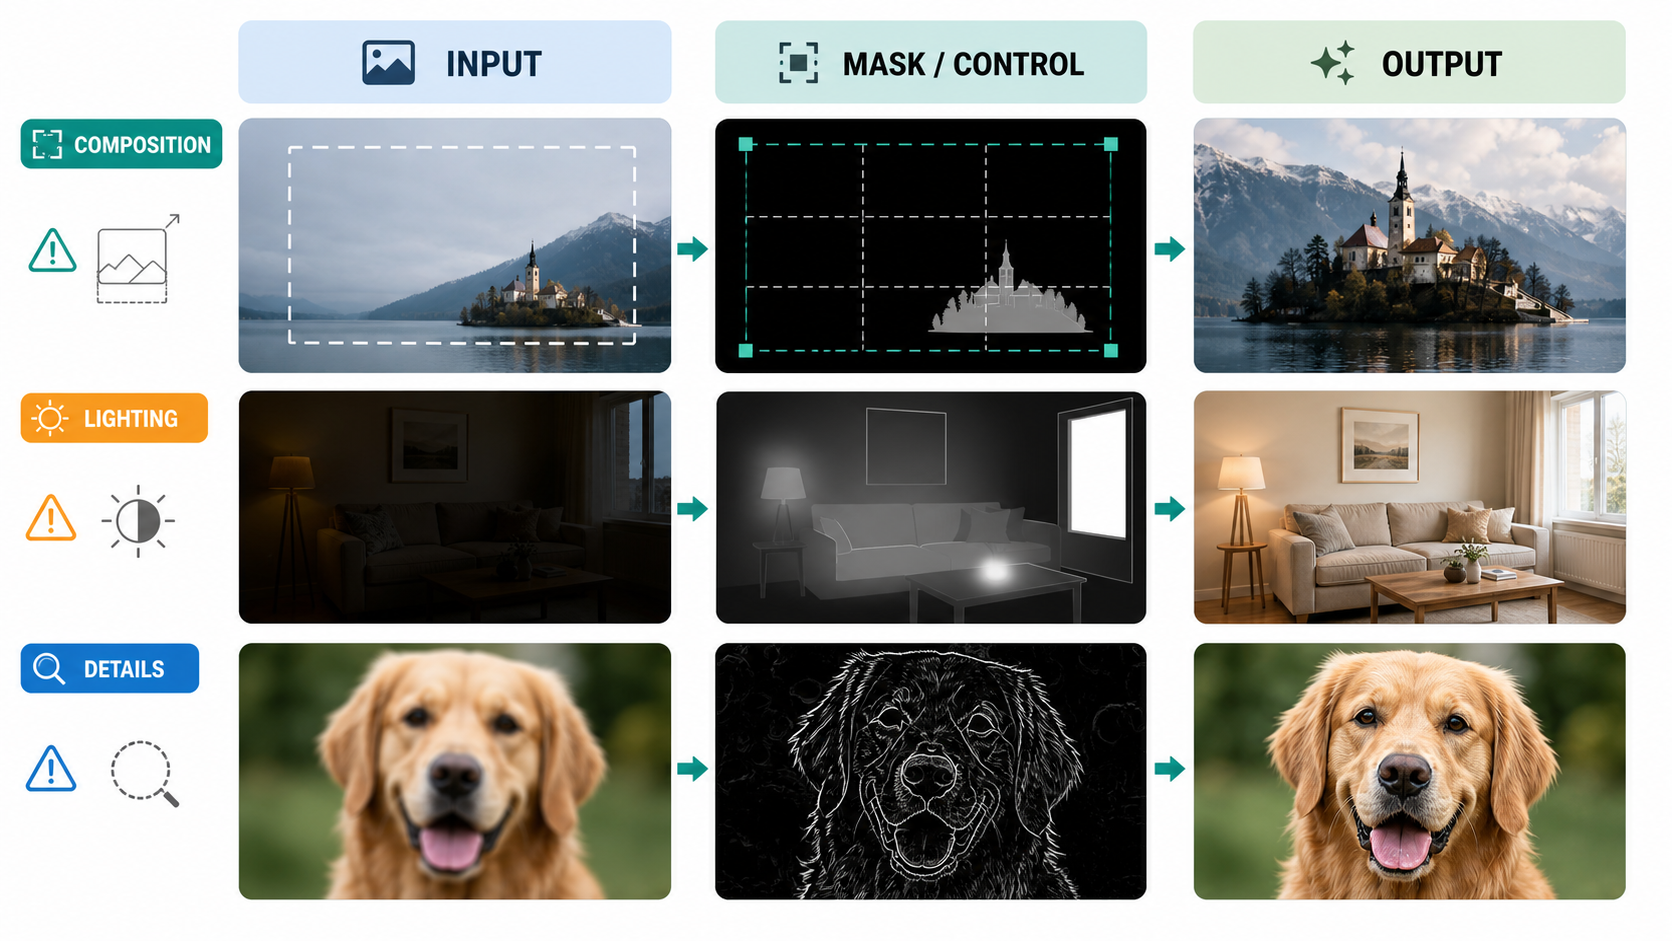
Image-to-image editing आम तौर पर predictable तरीकों से fail होती है। Subject crop हो जाता है। हाथ में extra fingers आ जाते हैं। नया object pasted-on sticker जैसा दिखता है। Masked edit पूरी face बदल देता है। हर pass के बाद output और dark हो जाता है। इस समय common reaction होता है वही prompt फिर चलाना, "realistic" या "high quality" जैसे शब्द जोड़ना, या steps बढ़ा देना। यह troubleshooting नहीं है। यह ज्यादा compute के साथ guesswork है।
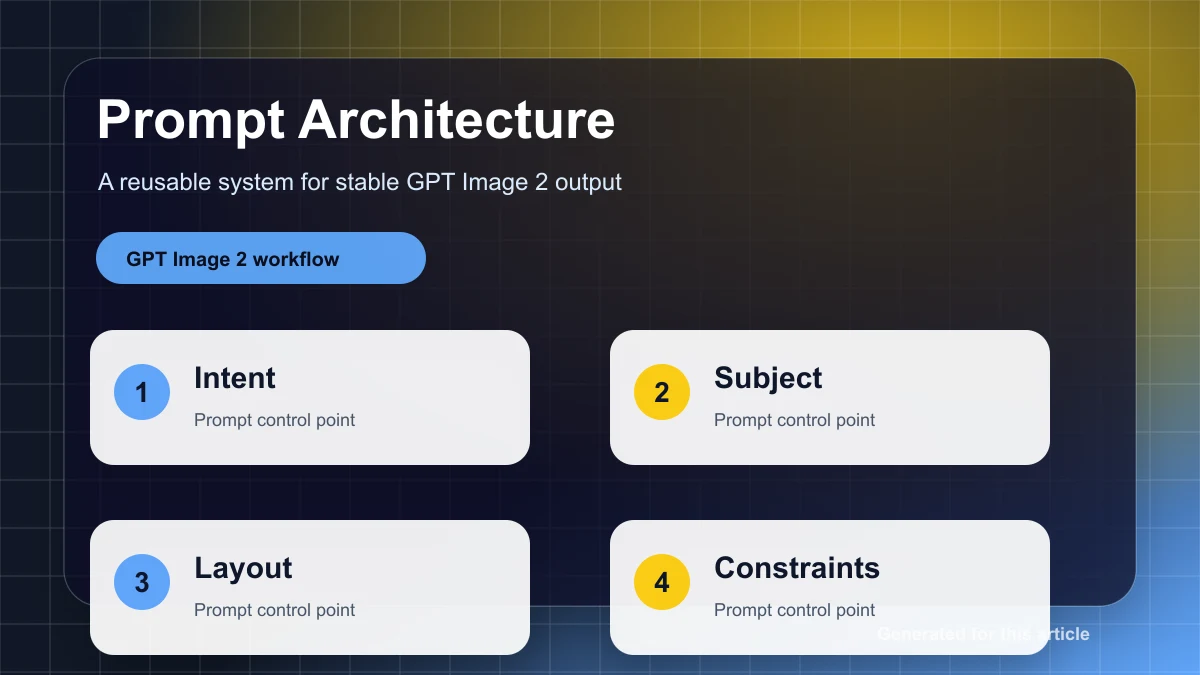
Practical rule साफ है: पहले structure ठीक करें, फिर lighting, फिर details। Composition errors geometry problems होते हैं। Lighting errors compositing problems होते हैं। Detail errors अक्सर local repair problems होते हैं। इन तीनों को सिर्फ prompt wording problem मानना unstable results देता है।
यह guide GPT Image 2 users के लिए लिखी गई है, लेकिन इसका framework Stable Diffusion, Diffusers, ComfyUI, WebUI और दूसरे diffusion-based image-to-image pipelines पर भी लागू होता है। मुख्य अंतर control surface का है। GPT Image 2 prompt, input image, mask, size, quality, output format, compression और background जैसे higher-level controls देता है। Traditional diffusion workflows में strength या denoise, CFG या guidance scale, steps, sampler, scheduler, seed, ControlNet, IP-Adapter और stricter inpaint mask behavior जैसे controls मिलते हैं।
यह अंतर मायने रखता है। जब edit clear हो और input images सही हों, GPT Image 2 बहुत अच्छा काम करता है। लेकिन अगर आपको Photoshop जैसी hard mask चाहिए, जहां हर unmasked pixel जस का तस रहे, तो यह हमेशा best tool नहीं है। Strict local repair के लिए diffusion inpaint अक्सर बेहतर होता है। Actual defect को solve करने वाला सबसे छोटा tool इस्तेमाल करें।
Diagnostic Order: Structure, Light, Detail
किसी भी parameter को बदलने से पहले failure classify करें।
अगर subject crop है, horizon गलत है, pose बदल गया है, left और right people की identities swap हो गई हैं, या table की perspective impossible है, तो यह composition problem है। शुरुआत steps बढ़ाकर या image sharpen करके न करें। पहले aspect ratio, canvas, mask scope और structural references जांचें।
अगर object सही जगह पर है लेकिन pasted लगता है, subject warm room में बहुत blue दिखता है, shadow गलत direction में जाती है, या edited clothing original lighting से लड़ती है, तो यह lighting problem है। Geometry lock करें, फिर main light direction, contact shadows, exposure और color temperature repair करें।
अगर image structurally correct है और lighting mostly काम कर रही है, तभी details repair करें: face likeness, hands, hair, fabric, product edges, logos, halos और texture। Detail work आम तौर पर local होना चाहिए। तीन fingers ठीक करने के लिए पूरी image rerender करना खराब trade-off है।
यह order सबसे common failure spiral रोकता है: गलत person बन चुके face पर skin repair करना, गलत perspective वाले object को sharpen करना, या जिस subject को पहले re-compose करना चाहिए था उसे relight करते रहना।
GPT Image 2 vs Diffusion I2I: आप सच में क्या control कर सकते हैं
GPT Image 2 में मुख्य levers ये हैं:
| Control | Practical use | Common mistake |
|---|---|---|
| Prompt | Edit goal और preservation rules define करता है | Local fix चाहिए लेकिन broad redesign मांगना |
| Input image | Identity, layout, style और context देता है | Weak reference देकर exact geometry expect करना |
| Mask | Model को edit area guide करता है | इसे hard pixel boundary मान लेना |
| Size / aspect ratio | Composition container set करता है | Full-body vertical subject के लिए square canvas इस्तेमाल करना |
| Quality | Detail, cost और latency balance करता है | हर debugging attempt में final quality इस्तेमाल करना |
| Multiple references | Identity, object replacement और style में मदद करता है | Style reference से pose या perspective भी enforce होने की उम्मीद करना |
Diffusion image-to-image में useful levers ज्यादा granular होते हैं:
| Parameter | What it changes | Useful starting point |
|---|---|---|
strength / denoise | Input image कितनी rewrite होगी | Local repair: 0.15-0.35; lighting: 0.30-0.50; structure change: 0.50-0.75 |
CFG / guidance_scale | Model prompt को कितनी मजबूती से follow करता है | Realistic edits: 4-6; general default: 6-8 |
steps | Denoising quality और runtime | Fast tests: 20-30; balanced: 30-50; difficult detail work: 50-80 |
seed | A/B tests की reproducibility | Diagnosis के दौरान fixed रखें |
sampler / scheduler | Denoising trajectory और failure mode | एक चुनें और parameter comparison से पहले उसे steady रखें |
| ControlNet scale | Structure guidance की strength | Soft: 0.4-0.6; strong: 0.6-0.8 |
| IP-Adapter scale | Reference-image influence की strength | Style: 0.4-0.6; identity या appearance: 0.6-0.8 |
Parameter tuning को sane रखने के लिए तीन rules हैं।
पहला, steps structure को reliably fix नहीं करते। वे texture और edges improve कर सकते हैं, लेकिन wrong pose, bad horizon या swapped subject relationship को consistently repair नहीं करेंगे।
दूसरा, CFG "quality" नहीं है। Guidance बहुत कम हो तो prompt ignore होता है। बहुत ज्यादा हो तो image oversaturated, brittle या कम natural हो सकती है। इसे तभी बढ़ाएं जब model कोई specific instruction साफ ignore कर रहा हो।
तीसरा, एक साथ दस variables test न करें। Diagnosis के दौरान seed, size, sampler और input lock करें। एक बार में सिर्फ एक major variable बदलें: mask scope, denoise, control map, reference image या prompt constraint।
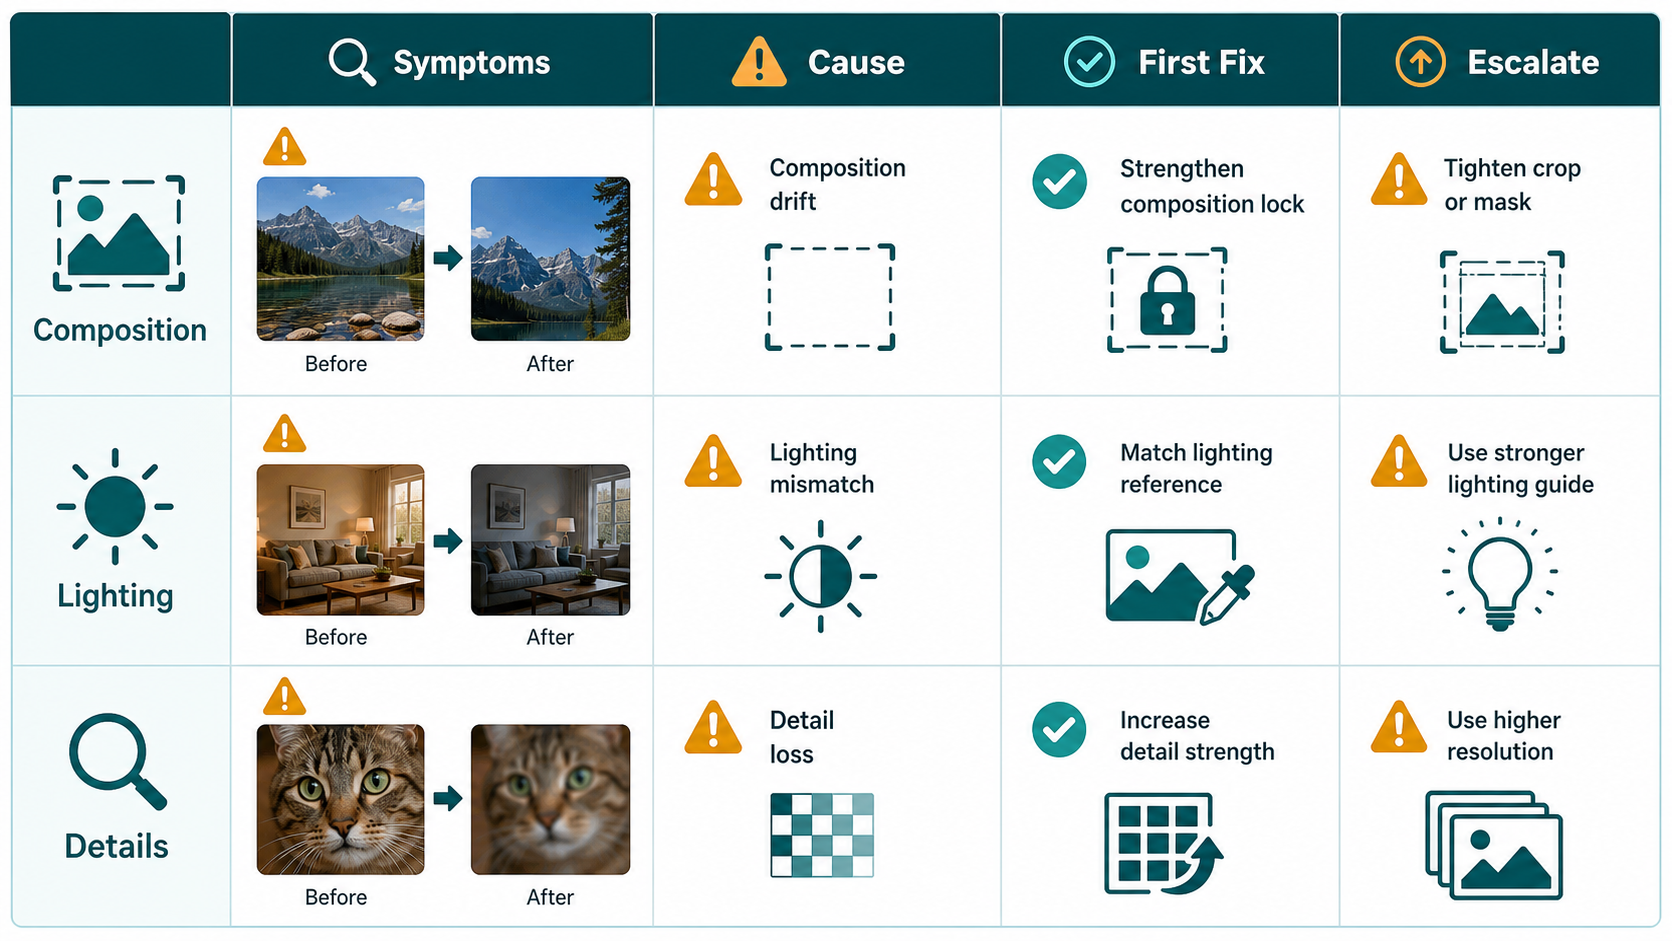
Common Failure Library और First Fixes
इस issue library को fast triage table की तरह इस्तेमाल करें।
| Symptom | Likely cause | Priority | First fix |
|---|---|---|---|
| Masked edit face, background या पूरी image बदल देता है | Mask hard boundary नहीं, suggestion की तरह treat हो रहा है; prompt बहुत ज्यादा मांग रहा है | P0 | Smaller region crop करें, edit goal narrow करें, और strict preserve list लिखें। अगर pixels untouched रहने जरूरी हैं, diffusion inpaint इस्तेमाल करें। |
| Subject crop है, head missing है, limbs frame से बाहर हैं | Wrong aspect ratio, tight canvas, "complete subject" instruction missing | P0 | पहले size बदलें या outpaint करें। full body, complete subject, natural margins मांगें। |
| Sketch-to-real output perspective खो देता है | Structural control के बिना semantic prompt; denoise बहुत high | P0 | depth, canny या lineart guidance इस्तेमाल करें। denoise घटाएं। Structure repair और material rendering अलग करें। |
| Two people roles swap करते हैं या body parts share करते हैं | Subjects के बीच prompt leakage; region separation नहीं | P0 | Separate subject descriptions, masks, regional prompting या pose control इस्तेमाल करें। |
| Inserted object sticker जैसा दिखता है | Contact shadow नहीं, scale गलत, mask contact area exclude करता है | P0 | सिर्फ object नहीं, object base और shadow area repair करें। Contact shadow direction और softness specify करें। |
| Repeated passes के बाद output dark होता जाता है | Loopback या repeated low-denoise edits exposure drift accumulate करते हैं | P1 | Loop रोकें। Separate exposure और white-balance pass करें। |
| Clothing replacement में light direction गलत है | Garment reference की lighting अलग है; prompt scene light lock नहीं करता | P1 | Camera और background preserve करें। Clothing को original light direction, shadows और color temperature से match करें। |
| Face अब person जैसा नहीं दिखता | Face broad full-image render में शामिल था | P0 | Face-only repair करें, identity reference दें, और expression, face shape, age, hair, proportions preserve करें। |
| Hands में wrong finger count या broken joints हैं | Complex contact, weak pose constraint या conflicting prompt | P0 | सिर्फ hand और contact point mask करें। Hand pose reference या openpose इस्तेमाल करें। Left और right hands अलग-अलग repair करें। |
| Upscaling के बाद texture blurry हो जाती है | Upscaling और repainting एक high-denoise pass में mix हुए | P1 | पहले upscale करें, फिर low-denoise local repair करें। |
| White edge, halo या fringing | Mask बहुत tight है; transparent-background expectation mismatch | P1 | Boundary के दोनों sides cover करने वाला edge-ring mask इस्तेमाल करें। GPT Image 2 में पहले opaque output दें और downstream cut out करें। |
P0 का मतलब है image fix हुए बिना deliver नहीं हो सकती। P1 visible defect है और quality hurt करता है। P2 defects इतने छोटे हैं कि final polish pass में handle हो सकते हैं।
Composition Troubleshooting
Composition problems ignore करना सबसे महंगा पड़ता है। Geometry गलत हो तो बाद की सारी fixes खराब base पर बनती हैं।
Cropped subjects के लिए canvas से शुरू करें। Vertical full-body image को vertical frame चाहिए। Labels के लिए जगह वाले product hero को horizontal space चाहिए हो सकता है। अगर original subject पहले से cut off है, nicer render मांगने से पहले outpaint करें या canvas expand करें। GPT Image 2 में prompt direct रखें: "move the camera back 10 to 20 percent, complete the missing head and arms, preserve the same face, outfit, background, camera height, and light direction."
Perspective problems के लिए structure जोड़ें। Diffusion workflows में interiors, architecture, furniture और spatial relationships के लिए depth इस्तेमाल करें। Products, logos, hard edges, diagrams और sketch-to-render work के लिए canny या lineart इस्तेमाल करें। Humans के लिए pose या keypoints इस्तेमाल करें। Product silhouette preserve करने के लिए openpose मत लगाएं। Canny से elbow direction समझने की उम्मीद न करें।
Two-person scenes में subjects को prompt में अलग करें। "The person on the left" और "the person on the right" के लिए अलग identity, clothing, pose और action descriptions होने चाहिए। अगर tool masks, regional prompting या segmentation support करता है, तो इस्तेमाल करें। कई multi-subject failures "bad hands" नहीं होते; वे bad region ownership होते हैं।
Lighting Troubleshooting
Lighting failures आम तौर पर compositing failures होते हैं। Edited object semantically सही हो सकता है, लेकिन scene का हिस्सा नहीं लगता।
Specify करने वाली चार चीजें हैं: main light direction, shadow behavior, color temperature और exposure। "Make it realistic" कमजोर है। "Match the existing warm left-side window light, add a soft contact shadow under the shoes, keep the background exposure unchanged, and preserve neutral skin tones" उपयोगी है।
जब object pasted-on लगता है, पूरी object repaint करने से शुरू न करें। Contact zone repair करें: floor पर feet, table पर product base, grass पर dog paws, counter पर cup edge, wall पर poster edge। Mask में object boundary और shadow receive करने वाली surface शामिल होनी चाहिए। Prompt में contact shadow, occlusion shadow, relevant reflection और matching shadow softness लिखें।
अगर repeated edits image को बहुत yellow, dark या contrasty बना दें, content editing रोकें। एक separate color pass चलाएं। Composition, identity, material और texture preserve करते हुए unified white balance और exposure मांगें। "replace the jacket" और "fix the entire color grade" को same pass में combine न करें, जब तक drift accept करने को तैयार न हों।
Detail Troubleshooting
Details को structure और lighting stable होने के बाद repair करना चाहिए।
Faces को small masks और identity constraints चाहिए। Whole face mask करें और थोड़ा surrounding context रखें: hairline, chin, ears और adjacent skin। सिर्फ एक eye mask न करें, जब तक asymmetry नहीं चाहिए। Model से exact likeness, face shape, age, expression, hairstyle, skin tone और camera angle preserve करने को कहें। Natural skin texture मांगें, plastic smoothing नहीं।
Hands को भी context चाहिए। Palm, fingers, wrist, object contact area और थोड़ा background mask करें। Gesture intention और object position preserve करें। अगर दोनों hands wrong हैं, उन्हें अलग-अलग repair करें। Complex hand-object interactions में pose या hand reference लंबी negative prompt से ज्यादा valuable होता है।
Edges को edge-ring mask चाहिए। अगर product में haloing है, mask को product edge के अंदर और बाहर दोनों sides cover करना होगा। सिर्फ object interior cover करने वाला mask transition fix नहीं करेगा। GPT Image 2 workflows में अक्सर opaque background पर generate या edit करना और फिर downstream background remove करना cleaner रहता है।
Texture को two-step workflow चाहिए। पहले upscale या super-resolution use करें। फिर weak texture area को low denoise या narrow edit prompt से repaint करें। High-denoise repainting को upscaling के साथ combine करेंगे तो अक्सर बेहतर detail नहीं, बड़ी blur मिलेगी।
Copy-Paste Prompt Templates
इन्हें structured prompts की तरह इस्तेमाल करें। GPT Image 2 में पूरा template paste करें और brackets भरें। Diffusion में useful लगे तो "do not" clauses को negative prompt में ले जाएं।
1. Cropping और Missing Body Parts ठीक करें
Task: Input image को recompose करें ताकि subject fully visible हो, और original identity, clothing, material, background style, camera height और time of day preserve रहें।
Preserve: face, hairstyle, body proportions, clothing colors, background layout, light direction।
Change: camera को लगभग 10 से 20 percent पीछे move करें, missing head, arms, hands, legs और feet complete करें, और subject के around natural margins छोड़ें।
Composition: original perspective और subject direction रखें। Image mirror न करें और left-right relationships न बदलें।
Do not: people add न करें, background न बदलें, expression न बदलें, color temperature या exposure न बदलें।
Diffusion start: denoise 0.30-0.50। Room या architecture unstable हो तो depth guidance जोड़ें।
2. Perspective और Proportions ठीक करें
Task: Input image में perspective और proportion errors correct करें।
Preserve: subject identity, scene content, materials, lighting और main camera angle।
Change: vertical lines को vertical बनाएं, horizon stabilize करें, floor/table/building vanishing lines align करें, और stretched या compressed shapes correct करें।
Composition: existing subject relationships रखें। Scene redesign न करें।
Do not: new elements add न करें, light direction न बदलें, person या product identity न बदलें।
Diffusion start: interiors या architecture के लिए depth 0.7-0.9; products और drawings के लिए canny/lineart 0.5-0.8; denoise 0.20-0.40।
3. Two Subjects और Left-Right Relationship Lock करें
Task: Two-subject pose और left-right relationship fix करें।
Left subject: [Character A] के रूप में रखें, hairstyle, face shape, skin tone, clothing और facing direction preserve करें।
Right subject: [Character B] के रूप में रखें, hairstyle, face shape, skin tone, clothing और facing direction preserve करें।
Pose: left subject [Action A] करे, right subject [Action B] करे। Positions swap न करें। Hands या gestures share न कराएं।
Composition: camera angle और scene unchanged रखें।
Do not: extra arms, extra fingers, wrong left/right hands, mixed identity या mixed skin tone create न करें।
Available हो तो pose control, segmentation या regional prompting इस्तेमाल करें।
4. Light Direction Match करें
Task: सिर्फ lighting consistency fix करें।
Preserve: subject identity, background, camera position, composition, action और materials।
Change: main light को [upper left / upper right / side / back] से आने जैसा बनाएं। Highlights, midtones, shadows और cast shadows को उसी light direction से align करें।
Shadows: Scene से matching softness के साथ natural contact shadows और ambient shadows बनाएं।
Do not: pose, background, color temperature या white balance न बदलें।
Diffusion start: denoise 0.25-0.45। Shadow-only fixes के लिए mask सिर्फ shadow और contact area पर रखें।
5. Sticker-Like Object Placement हटाएं
Task: [person/object/animal] को pasted-on दिखने के बजाय scene में naturally belong कराएं।
Preserve: subject appearance और हर unmasked region।
Change: contact point के आसपास realistic contact shadow, subtle occlusion shadow, और necessary reflection या bounce light जोड़ें।
Spatial relationship: shadow direction और shadow density को existing floor, wall, table या ground material से match करें।
Do not: subject shape, background layout या subject color न बदलें।
अगर कई contact points हैं, उन्हें छोटे अलग passes में repair करें।
6. Exposure और Color Temperature Unify करें
Task: exposure और color temperature unify करें ताकि image एक camera से एक ही moment पर captured लगे।
Preserve: composition, subject identity, background, material और texture।
Change: natural white balance restore करें, blown highlights रोकें, shadows readable रखें, और skin tones natural बनाएं। Overall color temperature [warm sunset / neutral daylight / cool overcast] हो।
Do not: scene content न बदलें, filter look add न करें, heavy cinematic grading apply न करें।
इसे अपनी अलग pass बनाएं। इसे large structure edit के साथ combine न करें।
7. Face Details Repair करें
Task: सिर्फ facial details repair करें।
Preserve: exact likeness, face shape, age, expression, hairstyle, skin tone और camera angle।
Change: eye symmetry, pupil direction, eyelashes, nostrils, lip edges, teeth, ears और natural skin texture fix करें।
Quality: realistic photographic detail, no over-smoothing, no cartoon style।
Do not: expression न बदलें, facial proportions न बदलें, hair या background को affect न करें।
Full face को थोड़ा surrounding context के साथ mask करें। Face tiny हो तो पहले upscale करें।
8. Hands Repair करें
Task: सिर्फ hand structure repair करें।
Preserve: gesture intention, left-right hand relationship, objects से contact position, subject identity और background।
Change: हर hand में natural number of fingers, correct joint bends, reasonable palm direction और natural fingertip contact बनाएं।
Detail: knuckles, nails, palm creases और shadows को exaggeration के बिना restore करें।
Do not: hands add न करें, left और right hands swap न करें, held object move न करें।
अगर दोनों hands broken हैं, left और right hands अलग-अलग repair करें।
9. Texture और Edge Artifacts Clean करें
Task: edge artifacts clean करें और realistic texture restore करें।
Preserve: subject shape, label text, color और overall composition।
Change: white edges, halos, fringing, jagged borders और blurry edges remove करें। Clear [hair/fabric/leather/product surface] texture और natural micro-contrast restore करें।
Background: edge transition natural रखें, कोई new glow न बनाएं।
Do not: subject redesign न करें, text न बदलें, background color न बदलें।
Edge-ring mask इस्तेमाल करें। Product cutouts के लिए पहले opaque पर edit करें, फिर downstream background remove करें।
Strategy: Inpaint, Control या Rerender?
छोटे defects के लिए local inpaint default है। इसमें drift सबसे कम होता है और यह identity और background को सबसे अच्छा protect करता है। Faces, hands, edges, contact shadows और छोटे texture failures के लिए इसे इस्तेमाल करें।
Tiny defects के लिए crop-first inpaint और बेहतर है। Problem area crop करें, higher apparent resolution पर repair करें, फिर उसे full image में वापस रखें। Eyes, fingers, product edges और labels के लिए यह useful है।
Full-image masked edit semantic changes के लिए useful है, जैसे outfit replacement, object insertion या broad style changes। यह guarantee नहीं है कि unmasked pixels untouched रहेंगे, खासकर GPT Image 2 में। इसे तभी use करें जब कुछ drift acceptable हो।
Full rerender broken structure के लिए है। अगर original layout गलत है, तो कई local patches से लड़ने के बजाय rerender साफ हो सकता है। Accept करें कि identity, light और detail को follow-up repairs की जरूरत पड़ सकती है।
Control images structural problems solve करते हैं। Canny और lineart edges preserve करते हैं। Depth space और perspective preserve करता है। Pose human joint relationships preserve करता है। Segmentation और regional prompting subject mixing घटाते हैं। IP-Adapter और reference images identity, product appearance या style preserve करते हैं, लेकिन structural controls को replace नहीं करते।
सीधी बात: local inpaint defects fix करता है; rerender image redesign करता है। जिस काम की जरूरत हो, वही इस्तेमाल करें।
Quick Troubleshooting Checklist
- Subject crop है या limbs frame से बाहर हैं: पहले aspect ratio बदलें या canvas expand करें।
- Perspective गलत है: steps बढ़ाने से पहले depth, canny या lineart इस्तेमाल करें।
- Two people mix हो रहे हैं: subjects को region, mask या prompt structure से split करें।
- Mask intended area से बाहर spill कर रहा है: smaller crop करें और prompt narrow करें; hard pixel preservation चाहिए तो diffusion inpaint पर जाएं।
- Image repeated edits के बाद dark हो रही है: loopback रोकें और एक exposure pass चलाएं।
- Object pasted-on लग रहा है: contact shadow और surface interaction repair करें।
- Color temperature drift कर रहा है: neutral daylight या warm sunset जैसे specific target के साथ one white-balance pass करें।
- Face likeness drift कर रही है: face-only repair करें, identity reference और strict preservation instructions दें।
- Hands break हो रहे हैं: small mask, hand reference या pose, एक बार में एक hand।
- Texture blur हो रही है: पहले upscale करें, फिर low-denoise local repair करें।
- Edge halo आ रहा है: object-interior mask नहीं, edge-ring mask इस्तेमाल करें।
- Debugging random लग रही है: seed, size, sampler और input lock करें; सिर्फ एक variable बदलें।
Blog या Team Review के लिए Recommended Before/After Layout
सबसे साफ presentation तीन-panel comparison है:
Input | Mask or Control Map | Output
Detail fixes के लिए 200 percent close-ups वाली second row जोड़ें। Team review के लिए छोटा parameter footer दें: model, size, quality, denoise, CFG, steps, sampler, scheduler, seed, control scale और reference scale। इससे diagnosis memory पर dependent नहीं रहता, repeatable बनता है।
Final Takeaway
ज्यादातर image-to-image failures mysterious नहीं हैं। Composition errors को canvas और structure control चाहिए। Lighting errors को compositing language चाहिए: light direction, contact shadow, exposure और color temperature। Detail errors को small masks, references और conservative repair चाहिए।
GPT Image 2 में winning move आम तौर पर clear edit goal, narrow scope, useful references और explicit preservation rules है। Diffusion workflows में reproducible parameter testing और structural controls जोड़ें। दोनों cases में surface polish करने से पहले base ठीक करें।