Практическое руководство по устранению проблем image-to-image для GPT Image 2 и diffusion workflow: композиционный дрейф, несоответствие света, ошибки лиц и рук, выход маски за границы, размытые текстуры и артефакты краев.
Редактирование image-to-image обычно ломается предсказуемо. Объект оказывается обрезан. У руки появляются лишние пальцы. Новый предмет выглядит приклеенным. Масочная правка меняет все лицо. Картинка темнеет после каждого прохода. Типичная реакция — запустить тот же prompt еще раз, добавить слова вроде "realistic" или "high quality", либо поднять steps. Это не диагностика. Это ставка большим количеством вычислений.
Практическое правило простое: сначала исправляйте структуру, затем свет, затем детали. Ошибки композиции — это геометрия. Ошибки освещения — это compositing. Ошибки деталей обычно требуют локального ремонта. Если считать все три проблемы лишь вопросом формулировки prompt, результат будет нестабильным.
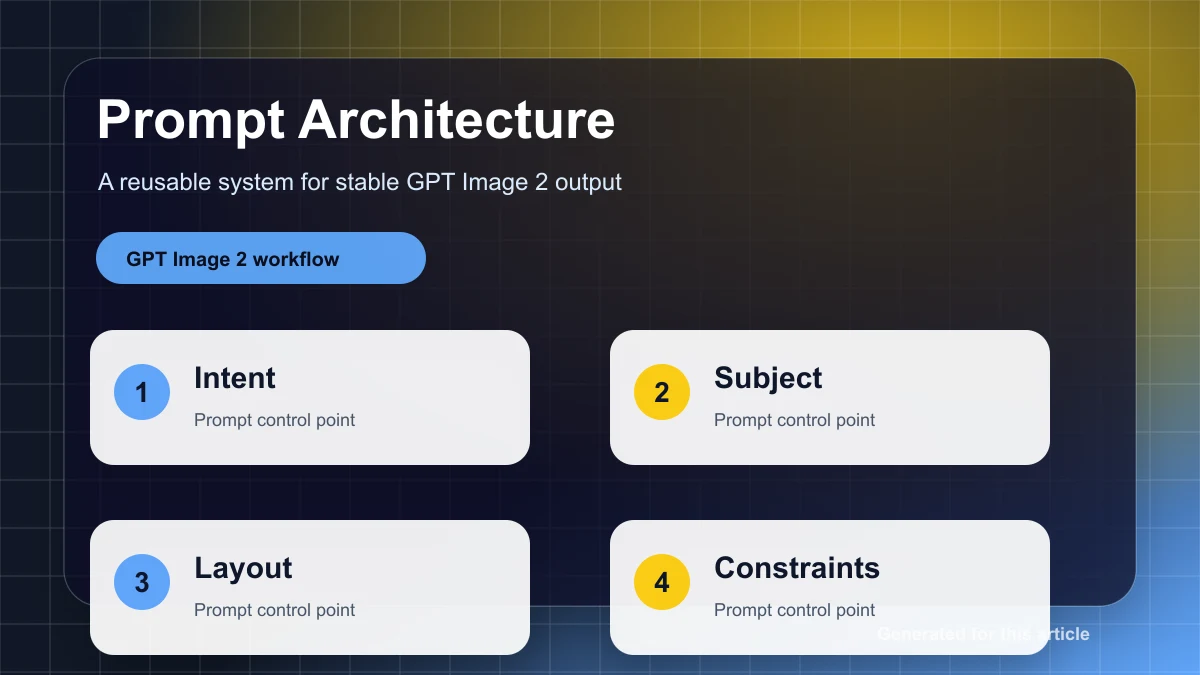
Это руководство написано для пользователей GPT Image 2, но подход подходит и для Stable Diffusion, Diffusers, ComfyUI, WebUI и других diffusion-based image-to-image pipeline. Главное отличие — поверхность управления. GPT Image 2 дает высокоуровневые параметры: prompt, input image, mask, size, quality, output format, compression и background. Традиционные diffusion workflow часто показывают strength или denoise, CFG или guidance scale, steps, sampler, scheduler, seed, ControlNet, IP-Adapter и более строгую семантику inpaint mask.
Это важно. GPT Image 2 часто силен, когда вы ясно описываете правку и даете правильные входные изображения. Но это не лучший инструмент, если нужна Photoshop-подобная жесткая маска, сохраняющая каждый немаскированный пиксель. Diffusion inpaint обычно лучше для строгого локального ремонта. Используйте самый простой инструмент, который решает реальный дефект.
Порядок диагностики: структура, свет, детали
Перед изменением параметров классифицируйте сбой.
Если объект обрезан, горизонт неверный, поза изменилась, люди слева и справа поменялись идентичностями, или стол получил невозможную перспективу, это проблема композиции. Не начинайте с увеличения steps или резкости. Сначала проверьте aspect ratio, canvas, область mask и структурные референсы.
Если объект стоит в правильном месте, но выглядит приклеенным, персонаж слишком синий для теплой комнаты, тень падает не туда, или новая одежда конфликтует с исходным светом, это проблема освещения. Зафиксируйте геометрию, затем исправляйте направление основного света, contact shadows, экспозицию и цветовую температуру.
Если структура правильная и свет в целом работает, переходите к деталям: сходство лица, руки, волосы, ткань, края продукта, логотипы, halos и текстура. Работа с деталями почти всегда должна быть локальной. Перерендер всей картинки ради трех пальцев — плохой обмен.
Такой порядок предотвращает типичную спираль: ретушировать кожу на лице уже не того человека, повышать резкость объекта с неправильной перспективой или пересвечивать персонажа, которого сначала надо было перекомпоновать.
GPT Image 2 и diffusion I2I: что реально можно контролировать
В GPT Image 2 основные рычаги такие:
| Контроль | Практическое применение | Частая ошибка |
|---|---|---|
| Prompt | Задает цель редактирования и правила сохранения | Просить широкий редизайн, когда нужен локальный фикс |
| Input image | Дает идентичность, раскладку, стиль и контекст | Давать слабый референс и ждать точной геометрии |
| Mask | Направляет область редактирования | Считать ее жесткой пиксельной границей |
| Size / aspect ratio | Задает контейнер композиции | Использовать квадратный canvas для вертикального full-body объекта |
| Quality | Балансирует детализацию, стоимость и задержку | Использовать финальное качество для каждого debug-прохода |
| Multiple references | Помогает с идентичностью, заменой объекта и стилем | Ждать, что style reference также зафиксирует позу или перспективу |
В diffusion image-to-image полезные параметры более детальные:
| Параметр | Что меняет | Полезная стартовая точка |
|---|---|---|
strength / denoise | Насколько сильно переписывается input image | Локальный ремонт: 0.15-0.35; свет: 0.30-0.50; изменение структуры: 0.50-0.75 |
CFG / guidance_scale | Насколько модель следует prompt | Реалистичные правки: 4-6; общий default: 6-8 |
steps | Качество denoising и время | Быстрые тесты: 20-30; баланс: 30-50; сложные детали: 50-80 |
seed | Воспроизводимость A/B тестов | Зафиксировать во время диагностики |
sampler / scheduler | Траектория denoising и типы сбоев | Выбрать один и держать постоянным до сравнения параметров |
| ControlNet scale | Сила структурного guidance | Мягко: 0.4-0.6; сильно: 0.6-0.8 |
| IP-Adapter scale | Сила влияния reference image | Стиль: 0.4-0.6; идентичность или внешний вид: 0.6-0.8 |
Три правила держат настройку параметров в здравых рамках.
Первое: steps не чинит структуру надежно. Он может улучшить текстуру и края, но не стабильно исправит неверную позу, плохой горизонт или перепутанные отношения между объектами.
Второе: CFG — это не "качество". Слишком слабый guidance игнорирует prompt. Слишком сильный guidance делает изображения перенасыщенными, хрупкими или менее естественными. Повышайте его только когда модель явно игнорирует конкретную инструкцию.
Третье: не тестируйте десять переменных одновременно. Во время диагностики фиксируйте seed, size, sampler и input. Меняйте одну крупную переменную: область mask, denoise, control map, reference image или ограничение prompt.
Библиотека частых сбоев и первые исправления
Используйте таблицу как быстрый triage.
| Симптом | Вероятная причина | Приоритет | Первое исправление |
|---|---|---|---|
| Масочная правка меняет лицо, фон или все изображение | Mask воспринимается как рекомендация, а не жесткая граница; prompt просит слишком много | P0 | Обрежьте меньшую область, сузьте цель правки и напишите строгий preserve list. Если пиксели обязаны остаться нетронутыми, используйте diffusion inpaint. |
| Объект обрезан, нет головы, конечности вне кадра | Неверный aspect ratio, тесный canvas, нет инструкции "complete subject" | P0 | Сначала измените size или сделайте outpaint. Просите full body, complete subject, natural margins. |
| Sketch-to-real теряет перспективу | Семантический prompt без структурного контроля; denoise слишком высок | P0 | Используйте depth, canny или lineart. Снизьте denoise. Разделите ремонт структуры и рендер материалов. |
| Два человека меняются ролями или делят части тела | Prompt leakage между субъектами; нет регионального разделения | P0 | Используйте отдельные описания, mask, regional prompting или pose control. |
| Вставленный объект похож на наклейку | Нет contact shadow, неверный масштаб, mask исключает контактную зону | P0 | Чините основание объекта и область тени, а не только объект. Укажите направление и мягкость contact shadow. |
| Output темнеет после повторных проходов | Loopback или повторные low-denoise правки накапливают drift экспозиции | P1 | Остановите loop. Сделайте отдельный проход экспозиции и white balance. |
| Замена одежды имеет неверное направление света | Референс одежды с другим светом; prompt не фиксирует свет сцены | P1 | Сохраните камеру и фон. Подгоните одежду под исходное направление света, тени и цветовую температуру. |
| Лицо больше не похоже на человека | Лицо попало в широкий full-image render | P0 | Используйте face-only repair с identity reference и сохраните выражение, форму лица, возраст, волосы и пропорции. |
| У рук неверное число пальцев или сломанные суставы | Сложный контакт, слабое pose constraint или конфликтующий prompt | P0 | Маскируйте только руку и точку контакта. Используйте hand pose reference или openpose. Чините левую и правую руки отдельно. |
| Текстура размывается после upscale | Upscaling и repainting смешаны в одном high-denoise проходе | P1 | Сначала upscale, затем local repair с низким denoise. |
| Белый край, halo или fringing | Mask слишком тесная; ожидание transparent background не совпадает | P1 | Используйте edge-ring mask по обе стороны границы. Для GPT Image 2 сначала выводите opaque, затем вырезайте downstream. |
P0 означает, что изображение нельзя сдавать до исправления. P1 означает, что дефект виден и снижает качество. P2-дефекты достаточно малы для финального polishing.
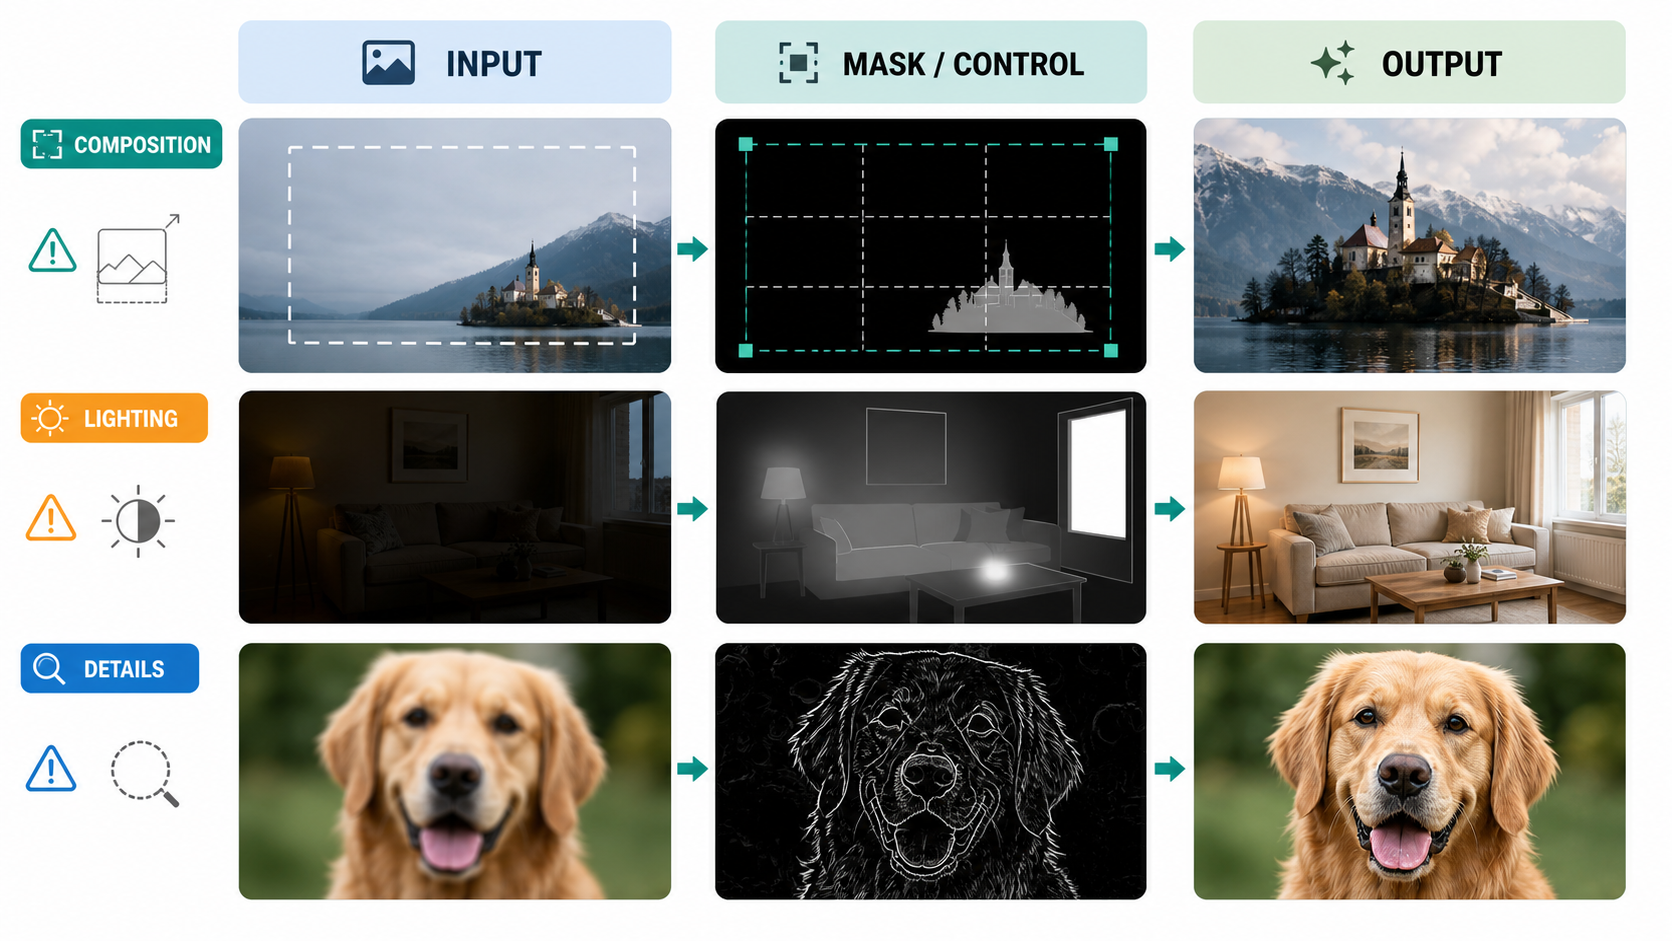
Устранение проблем композиции
Композиционные проблемы дороже всего игнорировать. Если геометрия неверна, последующие правки строятся на плохой основе.
Для обрезанных объектов начните с canvas. Вертикальное full-body изображение требует вертикального кадра. Product hero с местом под подписи может требовать горизонтального пространства. Если исходный объект уже обрезан, сначала outpaint или расширьте canvas, а потом просите красивый render. В GPT Image 2 держите prompt прямым: "move the camera back 10 to 20 percent, complete the missing head and arms, preserve the same face, outfit, background, camera height, and light direction."
Для проблем перспективы добавьте структуру. В diffusion workflow используйте depth для интерьеров, архитектуры, мебели и пространственных отношений. Используйте canny или lineart для продуктов, логотипов, жестких краев, диаграмм и sketch-to-render. Используйте pose или keypoints для людей. Не используйте openpose для сохранения силуэта продукта. Не ждите, что canny поймет направление локтя.
Для сцен с двумя людьми разделяйте субъектов в prompt. "The person on the left" и "the person on the right" должны иметь отдельные описания идентичности, одежды, позы и действия. Если инструмент поддерживает mask, regional prompting или segmentation, используйте их. Многие multi-subject ошибки — не "плохие руки", а плохое владение регионами.
Устранение проблем освещения
Ошибки света обычно являются ошибками compositing. Отредактированный объект может быть семантически правильным, но не принадлежать сцене.
Нужно указать четыре вещи: направление основного света, поведение теней, цветовую температуру и экспозицию. "Make it realistic" — слабая формулировка. "Match the existing warm left-side window light, add a soft contact shadow under the shoes, keep the background exposure unchanged, and preserve neutral skin tones" — полезная.
Когда объект выглядит приклеенным, не repaint весь объект первым делом. Чините контактную зону: ноги на полу, основание продукта на столе, лапы собаки на траве, край чашки на столешнице, край постера на стене. Mask должна включать границу объекта и поверхность, принимающую тень. Prompt должен упоминать contact shadow, occlusion shadow, reflection если нужно, и matching shadow softness.
Если повторные правки делают изображение слишком желтым, темным или контрастным, прекратите менять контент. Сделайте отдельный цветовой проход. Просите unified white balance and exposure, сохраняя композицию, идентичность, материал и текстуру. Не объединяйте "replace the jacket" и "fix the entire color grade" в одном проходе, если не готовы к drift.
Устранение проблем деталей
Детали нужно чинить после стабилизации структуры и света.
Лицам нужны маленькие маски и constraints идентичности. Маскируйте все лицо плюс немного контекста: линия волос, подбородок, уши и соседняя кожа. Не маскируйте один глаз, если не хотите асимметрии. Попросите модель сохранить exact likeness, face shape, age, expression, hairstyle, skin tone и camera angle. Просите natural skin texture, а не plastic smoothing.
Рукам тоже нужен контекст. Маскируйте ладонь, пальцы, запястье, контакт с объектом и немного фона. Сохраняйте намерение жеста и положение объекта. Если обе руки плохие, чините их отдельно. Для сложных hand-object interactions pose или hand reference полезнее длинного negative prompt.
Краям нужна edge-ring mask. Если у продукта haloing, mask должна покрывать границу внутри и снаружи края продукта. Mask только внутри объекта не исправит переход. Для GPT Image 2 workflow часто чище сначала генерировать или редактировать на opaque background, а затем удалять фон downstream.
Текстуре нужен двухшаговый workflow. Сначала upscale или super-resolution. Затем repaint только слабую область текстуры с низким denoise или узким edit prompt. Если совместить high-denoise repainting с upscaling, часто получится больше размытия, а не деталей.
Шаблоны prompt для копирования
Используйте их как структурированные prompts. Для GPT Image 2 вставьте весь шаблон и заполните скобки. Для diffusion переносите "do not" clauses в negative prompt, когда это полезно.
1. Исправить обрезку и недостающие части тела
Task: Recompose the input image so the subject is fully visible while preserving the original identity, clothing, material, background style, camera height, and time of day.
Preserve: face, hairstyle, body proportions, clothing colors, background layout, light direction.
Change: move the camera back by about 10 to 20 percent, complete the missing head, arms, hands, legs, and feet, and leave natural margins around the subject.
Composition: keep the original perspective and subject direction. Do not mirror the image or change left-right relationships.
Do not: add people, change the background, change the expression, change color temperature, or change exposure.
Старт для diffusion: denoise 0.30-0.50. Добавьте depth guidance, если комната или архитектура нестабильны.
2. Исправить перспективу и пропорции
Task: Correct perspective and proportion errors in the input image.
Preserve: subject identity, scene content, materials, lighting, and the main camera angle.
Change: make vertical lines vertical, stabilize the horizon, align floor/table/building vanishing lines, and correct stretched or compressed shapes.
Composition: keep the existing subject relationships. Do not redesign the scene.
Do not: add new elements, change light direction, or change the person or product identity.
Старт для diffusion: depth 0.7-0.9 для интерьеров или архитектуры; canny/lineart 0.5-0.8 для продуктов и рисунков; denoise 0.20-0.40.
3. Зафиксировать двух субъектов и их отношения слева-справа
Task: Fix the two-subject pose and left-right relationship.
Left subject: keep as [Character A], preserving hairstyle, face shape, skin tone, clothing, and facing direction.
Right subject: keep as [Character B], preserving hairstyle, face shape, skin tone, clothing, and facing direction.
Pose: left subject performs [Action A], right subject performs [Action B]. Do not swap positions. Do not share hands or gestures between them.
Composition: keep the camera angle and scene unchanged.
Do not: create extra arms, extra fingers, wrong left/right hands, mixed identity, or mixed skin tone.
Используйте pose control, segmentation или regional prompting, если доступно.
4. Совместить направление света
Task: Fix lighting consistency only.
Preserve: subject identity, background, camera position, composition, action, and materials.
Change: make the main light come from [upper left / upper right / side / back]. Align highlights, midtones, shadows, and cast shadows with that light direction.
Shadows: create natural contact shadows and ambient shadows with softness matching the scene.
Do not: change the pose, background, color temperature, or white balance.
Старт для diffusion: denoise 0.25-0.45. Для исправления только теней маскируйте только тень и контактную область.
5. Убрать ощущение приклеенного объекта
Task: Make [person/object/animal] belong naturally in the scene instead of looking pasted on.
Preserve: the subject appearance and every unmasked region.
Change: add realistic contact shadow, subtle occlusion shadow, and necessary reflection or bounce light around the contact point.
Spatial relationship: match shadow direction and shadow density to the existing floor, wall, table, or ground material.
Do not: change subject shape, background layout, or subject color.
Если контактных точек несколько, чините их маленькими отдельными проходами.
6. Унифицировать экспозицию и цветовую температуру
Task: unify exposure and color temperature so the image looks captured by one camera at one moment.
Preserve: composition, subject identity, background, material, and texture.
Change: restore natural white balance, prevent blown highlights, keep shadows readable, and make skin tones natural. Overall color temperature should be [warm sunset / neutral daylight / cool overcast].
Do not: change scene content, add a filter look, or apply heavy cinematic grading.
Делайте это отдельным проходом. Не объединяйте с крупной структурной правкой.
7. Исправить детали лица
Task: repair facial details only.
Preserve: exact likeness, face shape, age, expression, hairstyle, skin tone, and camera angle.
Change: fix eye symmetry, pupil direction, eyelashes, nostrils, lip edges, teeth, ears, and natural skin texture.
Quality: realistic photographic detail, no over-smoothing, no cartoon style.
Do not: change expression, change facial proportions, affect hair, or affect the background.
Маскируйте все лицо с небольшим контекстом вокруг. Сначала upscale, если лицо крошечное.
8. Исправить руки
Task: repair hand structure only.
Preserve: gesture intention, left-right hand relationship, contact position with objects, subject identity, and background.
Change: make each hand have a natural number of fingers, correct joint bends, reasonable palm direction, and natural fingertip contact.
Detail: restore knuckles, nails, palm creases, and shadows without exaggeration.
Do not: add hands, swap left and right hands, or move the held object.
Чините левую и правую руки отдельно, если обе сломаны.
9. Очистить текстуру и артефакты краев
Task: clean edge artifacts and restore realistic texture.
Preserve: subject shape, label text, color, and overall composition.
Change: remove white edges, halos, fringing, jagged borders, and blurry edges. Restore clear [hair/fabric/leather/product surface] texture and natural micro-contrast.
Background: keep the edge transition natural with no new glow.
Do not: redesign the subject, change text, or change background color.
Используйте edge-ring mask. Для product cutouts сначала редактируйте на opaque, затем удаляйте background downstream.
Стратегия: inpaint, контроль или rerender?
Local inpaint — выбор по умолчанию для малых дефектов. У него минимальный drift, и он обычно лучше сохраняет идентичность и фон. Используйте его для лиц, рук, краев, contact shadows и небольших проблем текстуры.
Crop-first inpaint еще лучше для крошечных дефектов. Обрежьте проблемную область, исправьте ее при более высокой видимой детализации, затем верните в полное изображение. Это полезно для глаз, пальцев, краев продукта и labels.
Full-image masked edit полезен для семантических изменений: замены одежды, вставки объекта или широкой смены стиля. Он не гарантирует, что немаскированные пиксели останутся нетронутыми, особенно в GPT Image 2. Используйте его, когда допустим некоторый drift.
Full rerender нужен для сломанной структуры. Если исходная раскладка неверна, rerender может быть чище, чем множество локальных заплаток. Примите, что идентичность, свет и детали могут потребовать последующих правок.
Control images решают структурные проблемы. Canny и lineart сохраняют края. Depth сохраняет пространство и перспективу. Pose сохраняет отношения человеческих суставов. Segmentation и regional prompting уменьшают смешение субъектов. IP-Adapter и reference images сохраняют идентичность, внешний вид продукта или стиль, но не заменяют structural controls.
Жесткое различие такое: local inpaint чинит дефекты; rerendering переделывает изображение. Не используйте одно, когда нужно другое.
Быстрый чеклист troubleshooting
- Объект обрезан или конечности вне кадра: сначала измените aspect ratio или расширьте canvas.
- Перспектива неверна: используйте depth, canny или lineart до повышения steps.
- Два человека смешиваются: разделите субъектов по region, mask или структуре prompt.
- Mask выходит за нужную область: обрежьте меньше и сузьте prompt; переходите на diffusion inpaint, если важна жесткая сохранность пикселей.
- Изображение темнеет после повторных правок: остановите loopback и сделайте один exposure pass.
- Объект выглядит приклеенным: исправьте contact shadow и взаимодействие с поверхностью.
- Цветовая температура уходит: сделайте white-balance pass с конкретной целью вроде neutral daylight или warm sunset.
- Сходство лица уходит: используйте face-only repair с identity reference и строгими инструкциями сохранения.
- Руки ломаются: маленькая mask, hand reference или pose, по одной руке.
- Текстура размывается: сначала upscale, потом low-denoise local repair.
- Появляется edge halo: используйте edge-ring mask, а не mask только внутри объекта.
- Debugging кажется случайным: зафиксируйте seed, size, sampler и input; меняйте одну переменную.
Рекомендуемый layout before/after для блога или командного review
Самая чистая подача — сравнение в три панели:
Input | Mask or Control Map | Output
Для исправления деталей добавьте вторую строку с 200 percent close-ups. Для командного review добавьте небольшой footer параметров: model, size, quality, denoise, CFG, steps, sampler, scheduler, seed, control scale и reference scale. Так диагностика становится воспроизводимой, а не зависящей от памяти.
Итог
Большинство image-to-image сбоев не мистические. Ошибкам композиции нужны canvas и structural control. Ошибкам света нужен язык compositing: направление света, contact shadow, exposure и color temperature. Ошибкам деталей нужны маленькие masks, references и консервативный repair.
С GPT Image 2 обычно выигрывает ясная цель правки, узкий scope, полезные references и явные preservation rules. В diffusion workflow добавьте воспроизводимое тестирование параметров и structural controls. В обоих случаях сначала чините основу, потом полируйте поверхность.